Think of an Amazon Storefront as your own dedicated, ad-free corner of the world's biggest marketplace. It's where you get to build a custom shopping experience that tells your brand story, shows off your entire product lineup, and drives sales without competitors breathing down your neck. This is how you turn casual lookers into loyal fans.
Why an Amazon Storefront Is a Non-Negotiable Brand Asset

A standard Amazon product page is a chaotic, noisy bazaar. Shoppers are constantly hit with "Sponsored products related to this item" and "Brands related to this category," pulling their focus away from what you're trying to sell.
An Amazon Storefront, on the other hand, is your exclusive boutique right in the middle of that chaos. It's a completely branded, multi-page experience where you control the conversation.
This is a huge competitive edge. When a shopper lands in your Storefront, every single product they see is yours. Every video tells your story. This distraction-free space is absolutely critical for building brand recognition and guiding customers through your product world, making it easy for them to find more things to love.
A Central Hub for Your Marketing Efforts
Beyond Amazon itself, a Storefront gives you a clean, easy-to-remember URL (like amazon.com/yourbrand) that becomes the perfect destination for all your off-Amazon traffic. Instead of sending people from a TikTok ad or a Google search to a single product page, you can guide them to a curated collection that perfectly aligns with your campaign.
- Social Media Campaigns: Drive traffic from Instagram stories or influencer posts directly to a "Shop the Look" or "As Seen On" page in your store.
- Paid Advertising: Make your Storefront URL the landing page for your Google Ads or Facebook campaigns. This ensures a seamless, on-brand journey from the ad click all the way to checkout.
- Email Marketing: Announce a new collection by linking your subscribers straight to a dedicated page featuring all the new products.
A well-designed Storefront transforms your Amazon presence from a simple sales channel into a powerful brand-building platform. It’s the difference between renting a shelf and owning the entire store.
This strategy is vital in a marketplace that's both jam-packed and full of opportunity. Independent sellers now account for over 60% of all sales on Amazon, which shows just how much the ecosystem has grown. But while there are over 9.7 million sellers worldwide, only about 2.5 million are actively selling. The takeaway? Standing out is everything.
Unlocking Powerful Customer Insights
One of the most valuable perks of having an Amazon Storefront is getting access to Store Insights. This analytics dashboard gives you a goldmine of data you can't get anywhere else, offering a direct look at how shoppers are engaging with your brand on Amazon. You can track key metrics like daily visitors, page views, and the sales generated directly from your store.
This data lets you make smart, informed decisions to fine-tune your strategy. You can see which pages get the most traffic, figure out where your visitors are coming from, and identify which products perform best in a branded setting. These insights are essential for optimizing your store and squeezing more value out of your marketing spend. You can even apply what you learn to broader campaigns. For more inspiration, check out our guide on the best ecommerce marketing strategies.
Your Pre-Launch Checklist for a Seamless Store Setup
Rushing into the Amazon Store Builder without a plan is a classic mistake. It almost always leads to frustrating delays and a storefront that looks pieced together at the last minute. Before you even think about dragging and dropping your first content module, you need to get your groundwork done.
Think of it like preparing all your ingredients before you start cooking. Having everything measured and ready means you can focus on the creative part, not scrambling to find things mid-recipe. The same rule applies here—preparation is everything.
Securing Your Brand on Amazon
The absolute first step, and the key that unlocks the Storefront feature, is enrolling in Amazon Brand Registry. This is Amazon's program for giving brand owners real control over their product listings and intellectual property. It's completely non-negotiable.
To get in, you need a registered trademark for your brand name or logo. This can be a text-based mark (a word mark) or an image-based one (a design mark).
- Pending Trademark? If you've applied for a trademark but it's still processing, you might be in luck. Amazon's IP Accelerator program can connect you with trusted law firms to help get a pending application accepted for Brand Registry access much faster.
- No Trademark? If you don't have one, this is your top priority. You cannot build a Storefront without it. Start the trademark application process immediately, because it can take several months to complete.
Once you’re in Brand Registry, you’ll get access to the Store Builder along with a whole suite of powerful brand-protection tools.
Understanding Your Account Type
Your ability to create a storefront is also tied to your account type. You absolutely must have a Professional Seller account, which comes with a monthly subscription fee, not an Individual "pay-as-you-go" account.
Beyond that, brands typically operate on one of two platforms:
- Seller Central: This is the home base for most third-party sellers who sell directly to customers on Amazon. You control your own pricing, inventory, and fulfillment (either yourself or through FBA). If you're managing your brand on Amazon, you're almost certainly here. For a deeper dive into fulfillment, you can learn more about what Amazon FBA means and how it works.
- Vendor Central: This is an invite-only platform where brands act as wholesalers, selling their inventory to Amazon, which then sells it to customers. Vendors also get access to Storefronts, but the management and advertising tools can differ slightly.
For the vast majority of brands starting out, a Professional Seller account combined with Brand Registry is the path forward.
Assembling Your Creative Assets
This is where so many sellers get stuck. You open the Store Builder, full of great ideas, only to realize you don't have the right images, videos, or copy ready to go. Gathering all these assets beforehand will save you countless hours of frustration.
Having a "brand kit" ready before you begin is the single best way to ensure a professional and consistent look. This prevents the all-too-common scenario of using mismatched, low-quality assets just to fill a space.
Your kit should be filled with high-quality, professional assets already formatted to Amazon's specifications. Before you dive in, make sure you have everything on this list ready to go.
Amazon Storefront Asset Preparation Checklist
Use this checklist as a quick-reference guide to make sure you have all the essential creative assets, dimensions, and information needed before you start building.
| Asset Type | Required Dimensions / Format | Key Considerations |
|---|---|---|
| Brand Logo | Minimum 400 x 400 pixels | Use a clean, high-resolution PNG with a transparent background. This gives you maximum flexibility across different header styles. |
| Header Image | Minimum 3000 x 600 pixels | This is the first thing shoppers see. Use a compelling lifestyle image or graphic that captures your brand's essence instantly. |
| Product Images | At least 1500 pixels on the longest side | Have a mix of clean product-on-white shots and lifestyle images that show your products being used in real-world scenarios. |
| Videos | MP4 format; file size under 500MB | Videos should be short (15-45 seconds is ideal), engaging, and optimized for viewing without sound. Always add captions. |
| Brand Copy | N/A | Prepare your brand story, mission statement, and some concise, benefit-driven headlines for different sections of your store. |
By checking these items off your list, you turn the process of building an Amazon Storefront from a daunting task into a straightforward assembly project. With your brand registered and your assets organized, you are truly ready to start building an experience that connects with customers.
Navigating the Amazon Store Builder Like a Pro
Once your brand is registered and you’ve got your creative assets ready to go, it’s time to jump into the Amazon Store Builder. This is where your vision actually starts coming to life. The interface is surprisingly user-friendly, with a drag-and-drop system that feels more like designing a simple website than wrestling with Amazon’s usual backend complexity.
Your first stop in Seller Central is the Stores dashboard. Think of this as your command center for creating, managing, and checking the performance of all your brand stores. It gives you a quick snapshot of your store's status, traffic, and sales, making it the perfect launchpad for any new build or update.
Choosing Your Foundation: A Blank Canvas or a Smart Template
When you create a new store, Amazon offers a few templates designed to get you up and running faster. These are based on common use cases and can be a fantastic starting point, especially if you're new to this.
- Marquee: This one is perfect for brands with a diverse product catalog. It’s designed to feel like a flagship store with multiple categories.
- Product Highlight: Got a hero product you want to show off? This template is built to drive all the attention to its key features and benefits.
- Product Grid: This is a simple, straightforward layout that works great for brands wanting to display a large number of products without much fuss.
Of course, you can always start with a blank template. This route requires a bit more planning but gives you total creative freedom to build a layout that’s 100% unique to your brand. Honestly, for most sellers, starting with a template and then customizing it offers the best balance of speed and control.
Building Your First Page and Designing the Header
Every store begins with a homepage, and this page sets the tone for the entire shopping experience. The very first thing you’ll design is the header, and it’s arguably one of the most important elements. It appears on every single page of your store, so it needs to instantly tell shoppers who you are.
This is where that logo and stunning hero image you prepared earlier come into play. A great header is visually compelling and immediately communicates what your brand is all about. It doesn't just show a product; it sells a feeling or a lifestyle.
The whole journey, from trademark to launch, follows a clear path. Getting the prep work done first makes the build phase so much smoother.
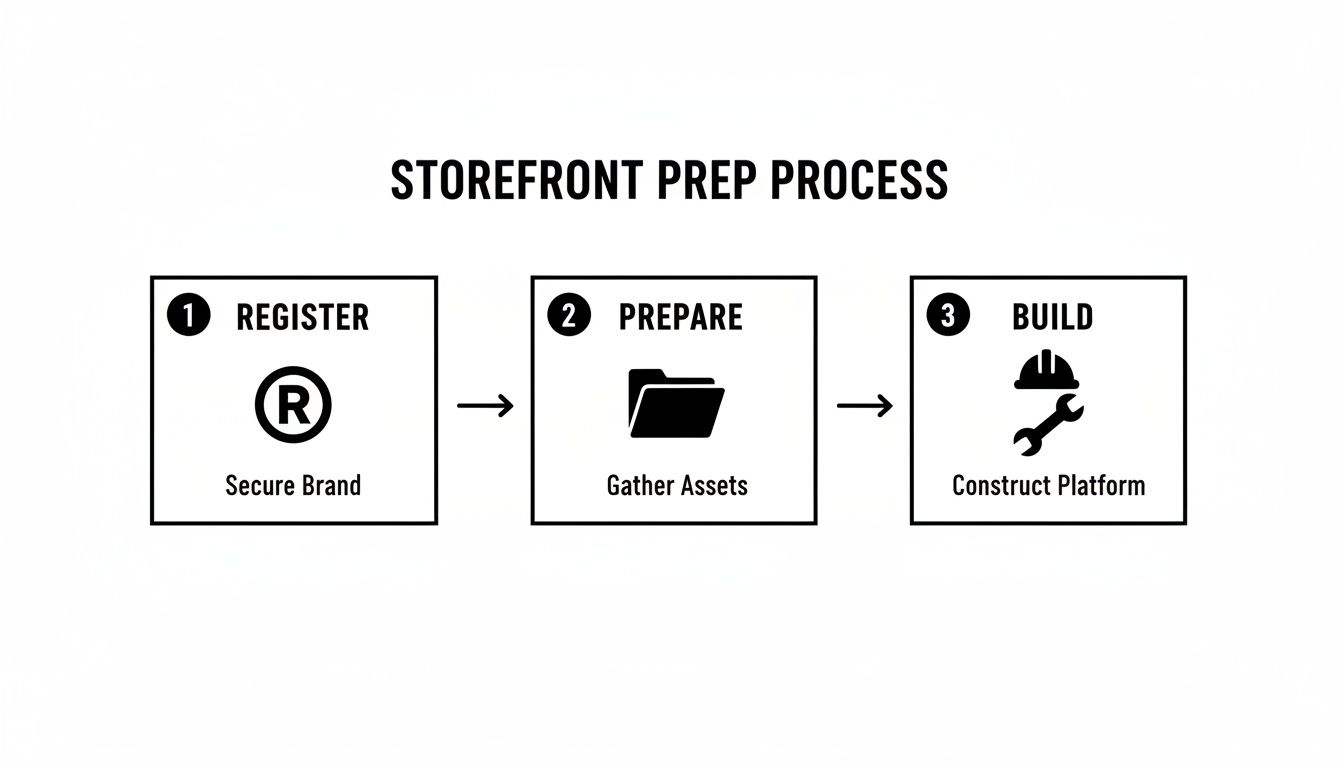
This process really highlights that the "build" phase is the final piece of the puzzle, reinforcing why you need to nail the registration and preparation stages first.
Mastering the Content Modules
The real magic of the Store Builder is in its content modules, or "tiles." These are the building blocks you'll use to construct each page. Mixing and matching these tiles strategically is what separates a generic, forgettable store from a high-converting one.
Here are some of the most powerful modules and how to use them:
- Product Grid: This is the workhorse of any store. Use it to display multiple products at once. You can hand-pick specific ASINs or set it to dynamically pull in products based on keywords, which is awesome for creating "New Arrivals" or "Best Sellers" sections.
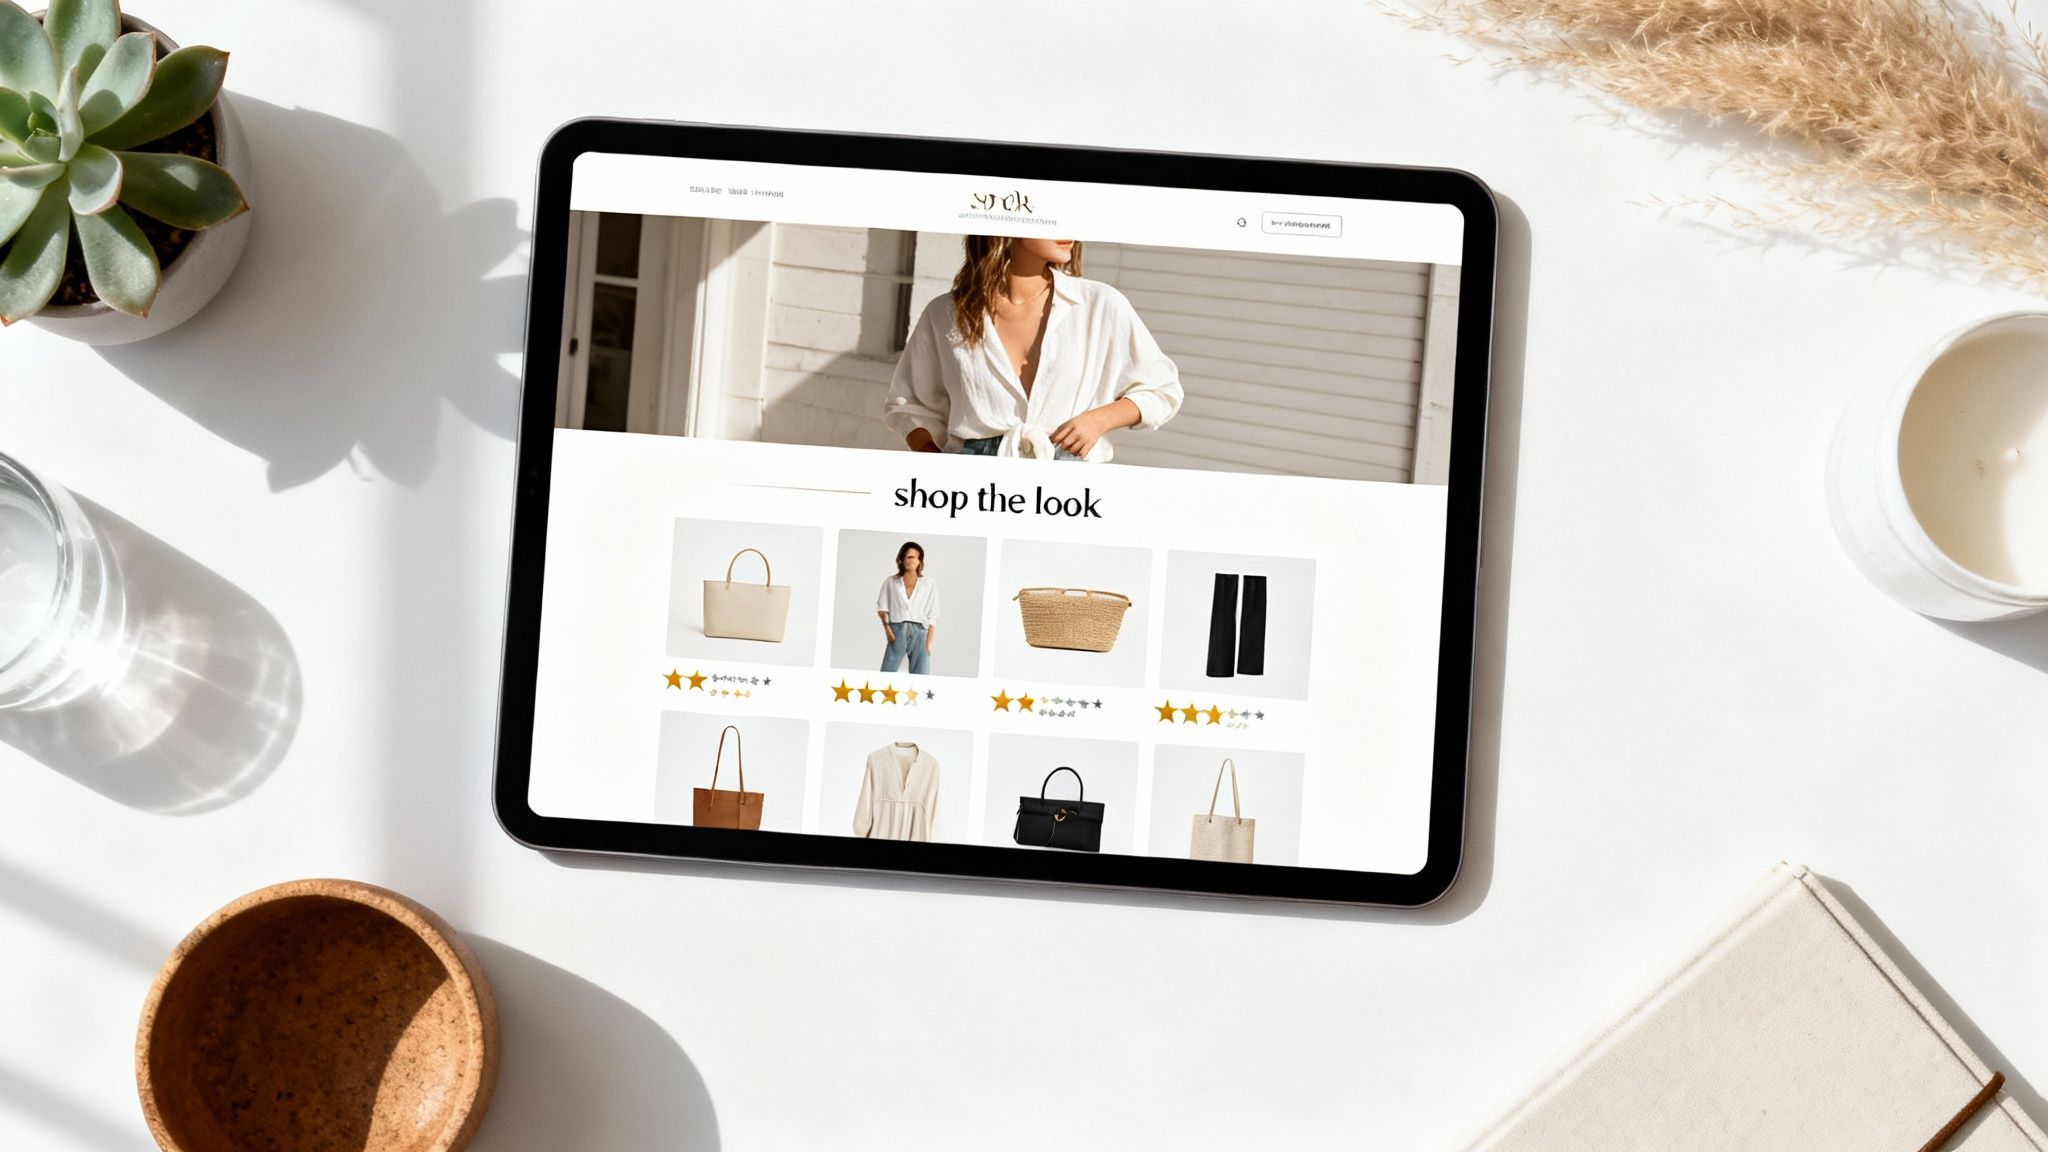
- Shoppable Image: This module is a game-changer for engagement. You upload a lifestyle photo, then tag specific products in it. When a customer hovers over a tag, a pop-up appears with product details and an "Add to Cart" button. It’s perfect for "Shop the Look" features.
- Video Tile: Video is an incredible storytelling tool. Use this tile for a brand story, a product demo, or customer testimonials. A well-placed video can seriously boost a shopper's connection to your brand and their confidence in your products.
- Text Tile: Don't sleep on the humble text tile. This is your chance to inject valuable keywords into your store, which helps with both on-Amazon and off-Amazon SEO. Use it for brief brand intros, mission statements, or to add context to product collections.
Pro Tip: When planning your page layout, think about the customer journey. Start with a broad, attention-grabbing module like a full-width video or a shoppable image. Then, guide them deeper with curated product grids and supporting text.
Structuring Your Navigation for a Great User Experience
A single-page store is fine if you only have a few products. But to create a true brand destination, you’ll want to build out multiple pages. The Store Builder makes it easy to add new pages and create an intuitive navigation menu in your header.
This is where you can organize your products into logical categories. For example, a skincare brand might create pages for:
- Cleansers & Toners
- Serums & Treatments
- Moisturizers & SPF
- Our Story
- Best Sellers
Clear navigation is critical. It keeps shoppers from getting overwhelmed and helps them find exactly what they're looking for, which dramatically increases the chance of a sale. It’s also important that the products you feature are ready for the spotlight. Before linking them in your store, it's a smart move to optimize your Amazon product listings with strong keywords and compelling copy.
By mastering these core elements—templates, headers, content modules, and navigation—you can turn the Store Builder from a simple tool into a powerful engine for building a professional and profitable Amazon Storefront.
Designing a Storefront That Actually Converts Shoppers
Just having an Amazon Storefront isn't enough to move the needle. A functional store gets you in the game, sure, but a thoughtfully designed one is what wins it. Your goal should be to create an experience that guides visitors, tells your brand's story, and makes buying feel like the most natural next step.
This is where good design and user experience (UX) come in. A great storefront is the difference between a cluttered flea market stall and a curated boutique—it draws the shopper's eye exactly where you want it to go.
Proven Layouts Used by Top Brands
You don't need to reinvent the wheel here. The most successful brands on Amazon tend to rely on proven layouts that tap into shopper psychology. One of the most effective models I've seen work time and again is the 'hero-category-social proof' structure.
Here's how it breaks down:
- The Hero Image: Your homepage should open with a powerful, full-width hero image or video. This isn't just another product shot; it’s an aspirational lifestyle image that captures the essence of your brand and makes an instant emotional connection.
- Key Categories: Right below that hero, feature your main product categories using clean, appealing images or graphics. This gives shoppers clear and immediate pathways to find exactly what they’re looking for without having to think too hard.
- Best-Sellers & Social Proof: Next, you hit them with a grid of your best-selling products. This is a classic move because it leverages social proof—if everyone else loves these items, new visitors will be more inclined to check them out. You can even mix in some customer quotes or user-generated photos here to make it more authentic.
This structure just works. It logically funnels visitors from broad brand appeal right down to specific product discovery.
Weaving a Visual Brand Story
The visuals in your Storefront do most of the heavy lifting when it comes to communicating your brand's personality. It’s all about finding the right balance between clean product photos and authentic brand storytelling.
To create a storefront that converts, the visual appeal of your products is non-negotiable. You might want to invest in professional Amazon product photography to make your listings really pop. While crisp, white-background shots are essential for product grids, lifestyle images are what build an emotional bridge. Show your products being used in real-world settings your customers can actually see themselves in.
A shopper might click on a product because they like its features, but they buy it because they can imagine it in their life. Lifestyle photos make that visualization effortless.
Visual consistency is especially critical on mobile, where the majority of Amazon traffic comes from. Always, always preview your store on a phone to make sure your images look great, the text is easy to read, and navigation is a breeze. A clunky mobile experience is a guaranteed way to lose a sale.
Smart Merchandising to Boost Order Value
Once you've nailed the design, you can use smart merchandising tactics to increase engagement and, more importantly, average order value (AOV). Your Storefront is the perfect place to go beyond simple product listings and start creating curated shopping experiences.
Think like a retail merchandiser. Build collections that solve a problem or tap into a specific need.
- Seasonal & Holiday Collections: Create dedicated pages for "Summer Essentials," a "Holiday Gift Guide," or "Back to School Must-Haves." This makes your store a timely and relevant destination people will want to check out.
- "Shop the Look" Features: Use shoppable image tiles to let customers buy everything featured in a lifestyle photo. This is a game-changer for fashion, home decor, and beauty brands because it encourages buying multiple items at once.
- Bundles & Kits: Group complementary products together. A "Beginner's Skincare Kit" or a "Complete Grilling Set" simplifies the buying process for the customer and often increases the total sale value for you. For more ideas on improving sales, explore these conversion rate optimization tips.
These merchandising strategies transform your store from a static catalog into a dynamic shopping destination. They give customers a reason to explore, discover new products, and ultimately, add more to their cart. This level of strategic presentation is what separates the casual sellers from the top performers.
Driving Performance: How to Optimize Your Store for Real Results
Getting your Amazon Storefront live is a huge step, but don't pop the champagne just yet. The launch is the starting line, not the finish. Now the real work begins: turning that beautiful store into a sales engine that consistently performs. This all comes down to continuous optimization, driven by smart SEO and cold, hard data.
Your first job is to get found. A lot of sellers mistakenly believe SEO is just for product detail pages. Your Storefront is a searchable, indexable asset that can—and should—rank both on Amazon and on Google. Weaving the right keywords into your store pages is non-negotiable.
Mastering Your Storefront's SEO
Think like your customer. They aren't just searching for your ASINs; they're looking for solutions, brands, and categories. Your Storefront’s page titles and meta descriptions are prime real estate for capturing that search traffic. Every single page you build has its own title and description fields—don't waste them.
- Page Titles: Get descriptive and pack them with keywords. A generic title like "Skincare" is a missed opportunity. Something like "Hydrating Skincare Solutions for Dry Skin" is much stronger.
- Meta Descriptions: This is your elevator pitch in the search results. Write a short, compelling summary of what's on the page, and make sure your primary keywords are in there naturally.
- Image Alt-Text: Every image you upload has a spot for alt-text. It’s not just for accessibility; it’s another chance to tell search algorithms what your images are about. Use relevant keywords here, too.
Even the text tiles you use in your layout have an SEO role. Use them to write short, engaging copy about your brand story or product lines, weaving in keywords as you go. This content gives search algorithms more to chew on, making your store more visible.
Making Sense of Your Amazon Store Insights
If you want long-term success, data has to be your best friend. Amazon gives you a powerful analytics dashboard called Store Insights, and learning to read it is one of the most important skills a brand owner can have. This is how you stop guessing what works and start knowing.
The dashboard tracks a handful of key metrics that paint a clear picture of your store's performance. You need to get in the habit of checking these numbers regularly to spot trends, find what's broken, and identify what's working.
Your Storefront is not a "set it and forget it" project. The brands that win are constantly A/B testing layouts, refreshing content based on performance, and refining their strategy. Think of your analytics as the roadmap for every improvement you make.
Let's break down the metrics that matter most and what they're telling you:
| Metric | What It Measures | What It Tells You |
|---|---|---|
| Daily Visitors | The number of unique shoppers who land on your store each day. | This shows your overall traffic and helps you measure the impact of your ad campaigns. |
| Page Views | The total number of pages viewed across your entire store. | A high page-views-per-visitor ratio means people are engaged and exploring, not just bouncing. |
| Sales | The total revenue generated from shoppers who visited your store. | This is the bottom-line number. It tells you if your store is actually converting browsers into buyers. |
| Traffic Sources | Where your visitors came from (e.g., Amazon organic search, Sponsored Brands ads, external links). | This is critical for understanding which of your marketing channels are actually driving traffic to your store. |
By digging into these numbers, you can quickly see which pages and products are the most popular. Is a specific category page getting a ton of traffic but generating zero sales? It’s probably time to rethink the layout or the products you're featuring. On the flip side, if one page is converting like crazy, figure out what makes it work and replicate that success elsewhere.
To really kick things up a notch, drive targeted traffic to your best pages with Amazon Pay Per Click (PPC) advertising. If you need a refresher on the basics, our detailed article on what is PPC on Amazon is a great place to start. This cycle of analyzing, testing, and refining is what separates a good storefront from a great one.
Common Questions About Amazon Storefronts
Even with a clear plan, a few questions always come up when you’re ready to build your Amazon Storefront. Let’s get those sorted out right away. Clearing up these common points from the start will save you a ton of time and help you avoid some rookie mistakes.
For instance, a lot of sellers assume a custom-branded space on Amazon has to come with a big price tag. The good news? That’s not the case at all.
How Much Does It Cost to Create an Amazon Storefront?
Building and hosting an Amazon Storefront is completely free for any brand enrolled in Amazon Brand Registry. Amazon doesn’t charge a dime to use the Store Builder tool, publish your store, or keep it live on their platform.
The only real costs are the ones you’d already have for running a serious brand on Amazon:
- Trademark Registration: You'll need a registered trademark to get into Brand Registry in the first place, which is a non-negotiable prerequisite.
- Professional Seller Account: You have to maintain a Professional Seller account to access brand tools like this, and that comes with a monthly subscription fee.
So, while there are standard business costs to get in the game, the act of actually building the store won't cost you anything.
Can I Drive External Traffic to My Storefront?
Absolutely—and you definitely should. This is hands-down one of the biggest advantages of having a Storefront. It gives you a clean, branded URL (like amazon.com/yourbrand) that’s perfect for all your marketing outside of Amazon.
Your Storefront URL is a powerful asset. Use it as the main landing page for your social media campaigns, influencer marketing, and email newsletters. It sends shoppers to a curated, distraction-free space where they can only see your products.
Sending traffic here is so much smarter than directing people to a standard product page, which is usually cluttered with competitor ads and "related items" that can easily pull your hard-won traffic away.
How Long Does Amazon Take to Approve a Storefront?
Once you’ve put the finishing touches on your store and hit "Submit for publishing," it goes into a moderation queue. Amazon's team will review everything to make sure it follows their advertising policies.
This approval process usually takes between 24 to 72 hours. Keep in mind, during busy seasons like Q4 leading up to the holidays, it can sometimes take a bit longer. If your store gets rejected, don't sweat it—Amazon will tell you exactly why, so you can make the fix and resubmit it without any guesswork.
Can I Update My Storefront After It Is Published?
Yes, and you should be doing this regularly. Your Storefront isn't a "set it and forget it" project; think of it as a living part of your brand. You can and should update it often to keep things fresh for your customers.
Whether you're launching a new product line, highlighting a seasonal promotion, or just want to swap out some lifestyle images, you can jump back into the Store Builder anytime. Just make your edits, resubmit for publishing, and it will go through the same quick moderation check before going live.
Navigating the complexities of Amazon requires a strategic partner who understands the platform inside and out. At Next Point Digital, we specialize in turning your Amazon presence into a powerful growth engine. From optimizing your storefront to driving targeted traffic, we build the strategies that convert clicks into loyal customers. Let's build your brand's future on Amazon together.