Optimizing an Amazon listing is the art and science of fine-tuning your product pages—from titles and images to those hidden backend keywords—to climb higher in Amazon's search results and, most importantly, turn shoppers into buyers. It's hands-down the most powerful way to get noticed, attract the right customers, and build real, sustainable sales momentum.
Why Optimizing Your Amazon Listing Is Crucial
Just throwing a product up on Amazon and hoping for the best doesn't work anymore. As of Q2 2025, you're competing with over 9.7 million sellers and more than 600 million products. In a marketplace this crowded, optimization is what separates the top sellers from the brands that get buried on page ten.
It’s not just a hunch, either. Listings with thoughtfully crafted content can see up to a 37% higher conversion rate compared to those with generic, slapped-together descriptions.
But optimization isn't just about making things look pretty for customers; it's about speaking the language of Amazon's A9 algorithm. This is the search engine that decides who wins and who loses. It prioritizes listings that are not only relevant to a search but are also most likely to make a sale. Things like keyword placement, image quality, and your sales history all feed into where you rank.
The Foundation of Amazon Success
Think of your listing as your digital storefront. A cluttered, confusing shop will send customers running, but a well-organized, informative one draws them in and guides them straight to the checkout.
Good optimization builds trust. It answers questions before a shopper even thinks to ask them and makes the value of your product crystal clear. The whole process really boils down to three core stages: research, creation, and analysis.
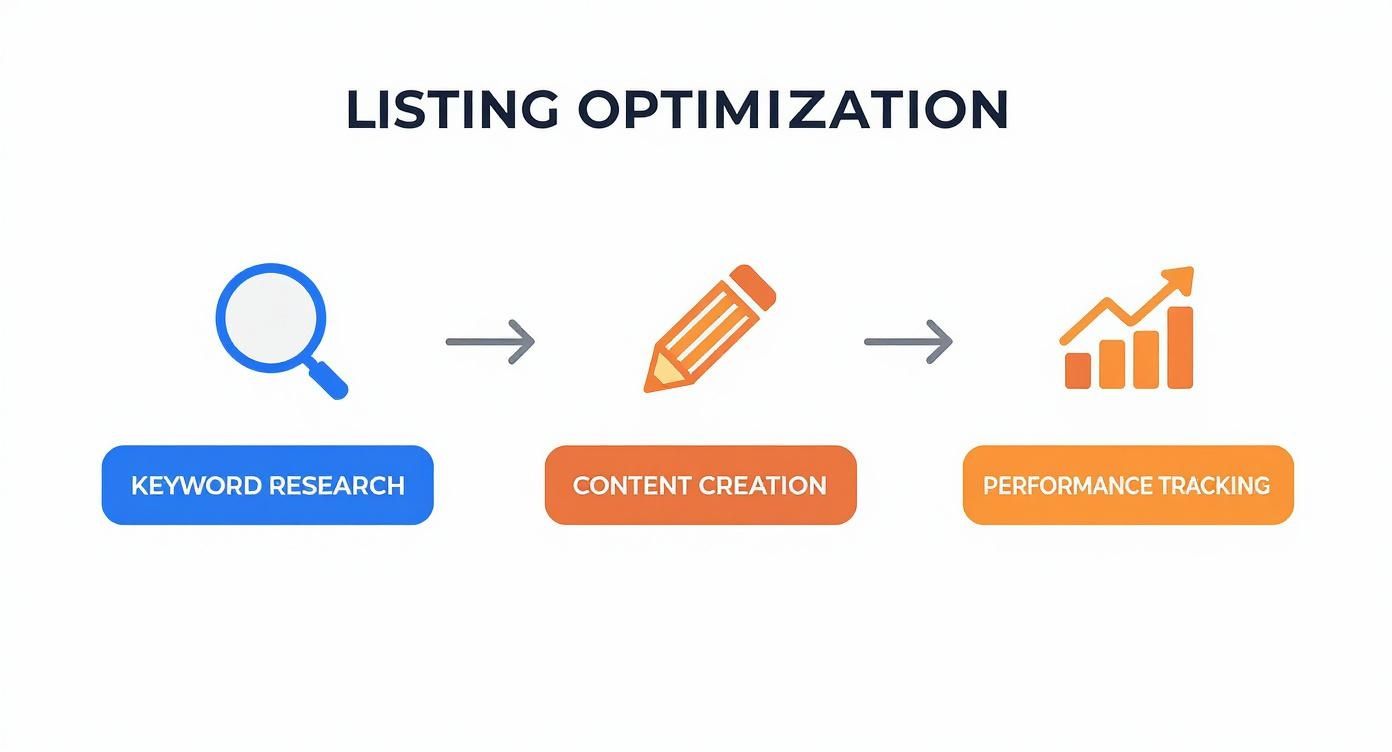
This workflow shows that optimization isn't a "set it and forget it" task. It's a continuous cycle of improvement, fueled by data and customer feedback. Each stage informs the next, creating a powerful engine for growth.
More Than Just Keywords
While keywords are the bedrock of getting found, a truly optimized listing goes way beyond that. It’s about creating a frictionless customer experience that makes buying your product feel like a no-brainer.
This includes:
- Compelling Visuals: High-quality images and A+ Content that tell a story and show your product in action.
- Benefit-Driven Copy: Bullet points and descriptions that solve a customer's problem, not just rattle off a list of features.
- Complete Backend Data: Filling out every last relevant field, like search terms and subject matter, to catch every possible search query.
For a deep dive that covers all the nuts and bolts, including Amazon's specific requirements, check out this guide on how to optimize an Amazon product listing). Nailing these elements is a critical first step, and if you're looking for more ways to build on that foundation, our guide on how to increase sales on Amazon is the perfect next step. https://npoint.digital/how-to-increase-sales-on-amazon/
To help you keep these moving parts organized, here's a quick breakdown of what to focus on and why.
Core Components of an Optimized Amazon Listing
This table outlines the essential elements of an Amazon listing and the primary goal you're trying to achieve with each one.
| Listing Component | Primary Optimization Goal | Key Metric Impacted |
|---|---|---|
| Product Title | Maximize keyword relevance for search visibility | Click-Through Rate (CTR) |
| Bullet Points | Communicate key benefits and features quickly | Conversion Rate |
| Product Description | Tell a compelling story and address pain points | Conversion Rate |
| Product Images & Video | Showcase product value and build trust | Conversion Rate, CTR |
| A+ Content | Enhance brand story and overcome objections | Conversion Rate, Sales |
| Backend Search Terms | Capture secondary and long-tail keywords | Search Impressions |
| Reviews & Ratings | Build social proof and customer confidence | Conversion Rate |
| Pricing Strategy | Win the Buy Box and appear competitive | Buy Box Percentage, Sales |
Getting each of these components right is what creates a listing that doesn't just attract traffic but consistently converts it.
Winning the Keyword Game for Your Title
Your product title is the single most important piece of real estate on your Amazon listing. It’s the first thing shoppers see and a massive ranking factor for the A9 algorithm. Getting it right means balancing keyword relevance with a clear, compelling message that grabs a buyer's attention instantly.
Think of your title as both a signpost for Amazon's algorithm and a headline for your customer. It needs to tell the algorithm exactly what your product is using high-value keywords. At the same time, it must be readable and persuasive enough to earn that crucial first click.

Uncovering High-Intent Keywords
The foundation of a great title is smart keyword research. This isn't about stuffing as many terms as possible; it’s about finding the right terms that signal strong buying intent. Start by putting yourself in the customer's shoes. What would they type into the search bar?
Begin with broad, "short-tail" keywords and then get more specific. For instance, if you sell a yoga mat, "yoga mat" is your starting point. But customers are looking for more.
They might search for:
- "extra thick yoga mat for knee support"
- "non slip yoga mat for hot yoga"
- "eco friendly cork yoga mat"
These longer, more descriptive phrases are long-tail keywords. They have lower search volume but much higher conversion rates because they capture a shopper with a very specific need. A person searching for an "eco friendly cork yoga mat" is much closer to making a purchase than someone just browsing for "yoga mat."
A key part of optimizing Amazon listings involves identifying these specific, high-intent phrases. While broad terms bring traffic, long-tail keywords bring customers who are ready to buy.
Finding these valuable terms is easier than you think. Use the Amazon search bar's autocomplete feature to see what real shoppers are searching for. Look at competitor titles and reviews to see the language they use.
Structuring a Title for Clicks and Conversions
Once you have a prioritized list of keywords, it's time to build your title. Amazon gives you up to 200 characters, but that doesn't mean you should use all of them. The sweet spot is often just enough to be descriptive without overwhelming the reader, especially on mobile devices.
A powerful title structure often follows a logical flow:
- Brand Name: Lead with your brand to build recognition.
- Primary Keyword/Product Identity: Clearly state what the product is.
- Key Feature or Benefit: What’s the main selling point? (e.g., "Extra Thick," "Non-Slip").
- Important Specs: Mention critical details like material, size, or color.
- Use Case or Audience: Who is this for? (e.g., "for Hot Yoga," "for Beginners").
For example, a weak title might be: "Great Yoga Mat – High Quality."
An optimized title, however, looks like this: ZenFlow | Eco-Friendly Cork Yoga Mat | Extra Thick 5mm for Joint Support, Non-Slip Grip | Includes Carry Strap
This version is packed with keywords but remains easy for a human to scan and understand. It immediately tells the shopper what it is, its key benefits, and what's included. This approach aligns with broader principles of online selling, which you can explore further in our guide to ecommerce SEO best practices.
The impact of this strategy is significant. According to a 2025 Jungle Scout study, nearly 80% of Amazon sellers prioritize relevant, high-quality keywords. Products that effectively use high-volume, low-competition keywords in their titles can see a click-through rate increase of up to 50%. Your title is your first—and best—chance to convince both the algorithm and the customer that your product is the perfect match.
Writing Bullet Points That Actually Sell
If your product title is the headline that gets the click, your bullet points are the sales pitch that closes the deal. Let's be honest—Amazon shoppers are scanners. They aren't reading your listing like a novel; they're hunting for quick, digestible info that proves your product is the one they need. This is your chance to turn boring features into compelling benefits.
So many sellers get this wrong. They just list specs. For example, writing "Made from 100% organic cotton" is a feature. It's a fact, sure, but it has zero punch. A benefit-driven approach flips this into something like, "Ultra-Soft & Breathable: Keep your baby comfortable and irritation-free with pure, GOTS-certified organic cotton." See the difference? One states a fact, the other solves a problem and paints a picture.
From Features to Compelling Benefits
The trick to crafting high-impact bullet points is to always answer the customer's unspoken question: "What's in it for me?" Every single feature your product has needs to be tied directly to a real-world benefit for the person buying it.
Think about the main pain points your product solves. Does it save time? Kill stress? Offer comfort? Lead with that benefit. A simple but powerful formula is [Benefit in All Caps]: [Feature explained].
Let’s take another look, this time for a portable phone charger:
- Weak, Feature-Based Point: "10,000mAh Battery Capacity"
- Strong, Benefit-Driven Point: NEVER RUN OUT OF POWER: Our high-capacity 10,000mAh battery packs over three full charges for your smartphone, so you can travel with total confidence.
This structure immediately grabs attention and screams value before you even get to the technical details.
Pro Tip: Dig through your customer reviews and your competitors' Q&A sections. This is a goldmine. You'll find the exact words and benefits that shoppers actually care about. If customers keep raving about your product's durability, that needs to be your first bullet point.
This strategy isn't just about tweaking words; it's a fundamental part of optimizing your listing for sales, not just clicks. You're building a connection and making the "buy now" decision a no-brainer.
Weaving in Keywords Naturally
Your bullet points are also prime real estate for those secondary and long-tail keywords that couldn't quite fit into the title. Amazon’s A9 algorithm absolutely indexes these bullet points, so getting the right keywords in there helps your search ranking.
But—and this is a big but—don't just stuff them in there. "Keyword stuffing" makes your copy sound robotic and clunky, and it can tank your conversion rate. The best approach is to let your keyword research guide the benefits you choose to highlight.
- If you're targeting "portable coffee maker for camping," a bullet point could be: BREW ANYWHERE YOU GO: Designed for camping and hiking, this lightweight and compact coffee maker ensures you never miss your morning ritual on the trail.
- If your keyword is "quiet office blender," you could write: WHISPER-QUIET OPERATION: Blend your morning smoothie without waking up your coworkers. Our advanced sound-dampening motor makes it the ideal quiet blender for any office.
This way, your listing gets indexed for important search terms while still sounding like it was written for a human.
Structuring Bullets for Maximum Impact
Amazon gives you five bullet points. Use them wisely. You're telling a quick, compelling story about your product. I've found this structure works wonders:
- Lead with the Biggest Punch: Start with your product's number one, most compelling selling point. What is the absolute best thing about it?
- Highlight What Makes You Different: How do you beat the competition? Is it better materials, a unique feature, smarter design? Spell it out.
- Handle Objections Before They Happen: Is it easy to clean? Is it durable? Answer these questions proactively so the customer doesn't have to wonder.
- Show Them How They'll Use It: Help the customer picture the product in their life. Talk about specific use cases.
- Build Trust with a Guarantee: End with a strong trust signal. Mention a warranty, satisfaction guarantee, or simply state everything that’s included in the box.
Focusing on this flow helps build the confidence a shopper needs to click "Add to Cart." Well-crafted bullet points are a direct line to better performance, and for a deeper dive on this, check out our detailed guide on how to improve conversion rates for ecommerce. They have the power to turn casual browsers into loyal customers.
Driving Conversions with Images and A+ Content
On Amazon, your visuals are your sales team. A great title and sharp bullet points will get shoppers to click, but it's your images and A+ Content that seal the deal. Customers can't touch or feel your product, so your pictures have to do all the heavy lifting—bridging that physical gap, building trust, and telling a story that makes them want to buy.
Words can only take you so far. A smart visual strategy answers customer questions before they even have to ask them. High-quality images don’t just show what a product looks like; they show its value, prove its quality, and help shoppers imagine it in their own lives. This is where so many sellers drop the ball, uploading a few basic, white-background shots and calling it a day.
Crafting a Complete Visual Narrative
To really make an impact, your image carousel needs to be more than just a gallery. Think of it as a mini-presentation, a strategic mix of different shots, each with a specific job to do in guiding the customer toward a purchase.
Your image lineup should include:
- The Hero Image: This is your main product photo on a pure white background. It has to be crisp, clear, and professional because it's the first thing anyone sees in the search results.
- Lifestyle Shots: Show your product being used in a real-world setting. If you’re selling a yoga mat, get a shot of someone using it in a bright, calm studio. This helps customers see themselves benefiting from what you sell.
- Infographics and Callouts: Use text overlays to highlight key features, dimensions, or materials. An infographic can communicate benefits in seconds that might get buried in a wall of text.
- Comparison Charts: Visually stack your product up against a generic version or an older model. This is a fantastic way to justify a higher price and show off what makes you different.
- "What's in the Box" Image: Lay out the product and every single accessory that comes with it. This sets clear expectations from the start and helps cut down on negative reviews about "missing" parts.
Getting your product images right is non-negotiable. For example, learning the effective use of phone case mockups to sell more can dramatically boost their quality and make them far more appealing to potential buyers.
The impact here is huge. Listings with a full suite of high-quality images, videos, and A+ content can see up to a 40% increase in conversion rates. In fact, over 70% of shoppers say product images are the single most influential factor in their decision to buy.
Elevating Your Brand with A+ Content
For anyone with a brand-registered product, A+ Content (which you might remember as Enhanced Brand Content or EBC) is a total game-changer. It lets you swap out that plain-text product description for a rich, modular layout of images, custom text, and comparison charts. This is your chance to build a real brand experience right on the product detail page.
With A+ Content, you can do so much more:
- Tell your brand's story and build a real connection with customers.
- Showcase product features in a way that’s far more engaging and easy to scan.
- Cross-sell other products from your catalog using slick comparison modules.
Here’s a look at the A+ Content Manager dashboard inside Seller Central. This is where the magic happens.

The tool gives you a bunch of pre-designed modules to pick from, letting you piece together a layout that tells your product’s story and highlights what makes it unique.
Designing A+ Content That Converts
Making great A+ Content isn't just about dropping in pretty pictures. It’s about strategic design that guides the shopper’s eye and reinforces why your product is the right choice. I always recommend starting with a big, impactful banner image that captures your brand's vibe or the product's main benefit.
From there, mix it up. Use different modules to break down key features. A combination of image-with-text blocks works well for explaining technical specs, while full-width images are perfect for showing off lifestyle context. I like to finish with a comparison chart that positions the product against others in our line—it’s a great way to keep customers shopping within your brand.
And remember, keep the text short and scannable. Use headers, bullet points, and bold text inside your A+ modules to make the info easy to digest. The goal is to create a seamless flow that answers questions, builds confidence, and makes hitting that "Add to Cart" button feel like the most natural next step.
Unlocking Hidden Backend Listing Elements
While your title, bullets, and images are your customer-facing sales pitch, a huge part of Amazon optimization happens completely behind the scenes. This is your backend, a set of fields hidden from shoppers but read loud and clear by Amazon's A9 algorithm.
Getting this right is like giving the search engine a secret map to your product.
The most powerful of these fields is Generic Keywords, which most sellers just call "backend search terms." This is your chance to add all the valuable keywords that didn't quite make the cut for your title or bullet points. Think of it as casting a wider net to capture search traffic you might otherwise miss out on.
Maximizing Your Backend Search Terms
This field is your keyword spillover container. It’s the perfect place for terms that are highly relevant but might have sounded awkward or clunky in your main copy.
It's the ideal spot for things like:
- Common misspellings: If you sell a "calligraphy pen," you should add "caligraphy pen" here. Shoppers make typos all the time.
- Synonyms and variations: For a "laptop stand," you'll want to include terms like "notebook riser" or "computer holder."
- Foreign-language equivalents: Selling a "salsa bowl" in the U.S. market? Adding "tazon para salsa" can capture a valuable audience segment.
Amazon gives you a character limit (currently under 250 bytes), so you need to be efficient. There's no need to repeat words already in your title, bullets, or brand name; the algorithm already sees those. You also don't need commas or any punctuation. Just use single spaces between words.
Key Takeaway: Your backend search terms field is pure SEO fuel. Fill it with unique, relevant keywords—including synonyms, misspellings, and related terms—to maximize your listing's discoverability without cluttering your customer-facing text.
For example, let's say you sell a "waterproof picnic blanket." Your backend terms could look something like this: outdoor mat sandproof beach travel portable compact foldable park concert ground cover tarp.
That single, clean string targets dozens of potential search queries without making your main listing look spammy.
Backend Keyword Optimization Do's and Don'ts
Here’s a quick reference guide to get the most out of your backend keyword fields. Following these best practices will help you stay within Amazon's guidelines and maximize your visibility.
| Best Practice (Do) | Common Mistake (Don't) |
|---|---|
| Use all available space up to the character limit. | Don't repeat keywords already in your title or bullets. |
| Include synonyms, slang, and common misspellings. | Don't use commas, semicolons, or other punctuation. |
| Use single spaces to separate words. | Don't include your brand name or competitor brand names. |
| Focus on highly relevant, but less obvious, terms. | Don't use subjective claims like "best" or "top-rated." |
Sticking to these rules ensures your backend terms are clean, effective, and fully indexed by the A9 algorithm.
Beyond Keywords: Other Vital Backend Fields
While the search terms field gets all the attention, ignoring the other backend attributes is a huge missed opportunity. Fields like 'Subject Matter' and 'Intended Use' are just as important for helping Amazon categorize your product and show it to the right people.
Filling these out properly helps your product appear in more filtered searches. You know that left-hand navigation bar where customers filter by material, special features, or occasion? Amazon pulls that data directly from these backend fields.
- Subject Matter: This helps Amazon understand the theme or topic of your product (e.g., "dinosaurs," "nautical," "minimalist").
- Intended Use: This clarifies the product’s application (e.g., "camping," "office," "birthday parties").
- Target Audience: Specify who the product is for ("men," "toddlers," "pet owners").
Completing these attributes connects you with high-intent shoppers who have already narrowed down exactly what they want. It’s a simple step that ensures you show up for more qualified, ready-to-buy customers.
These operational details are also important for sellers using specific fulfillment methods; to understand more about this, you can learn what Amazon FBA means and how it connects to your overall strategy.
Ultimately, a complete backend is the hallmark of a thoroughly optimized listing. It ensures you're using every tool Amazon gives you to increase visibility and reach the widest possible audience.
Measuring Performance to Refine Your Listing
You’ve put in the work. Your title is packed with keywords, your bullets are compelling, and your images look sharp. But here’s the thing: optimizing your Amazon listing isn't a "set it and forget it" task. It's a cycle. You test, you measure, and then you refine.
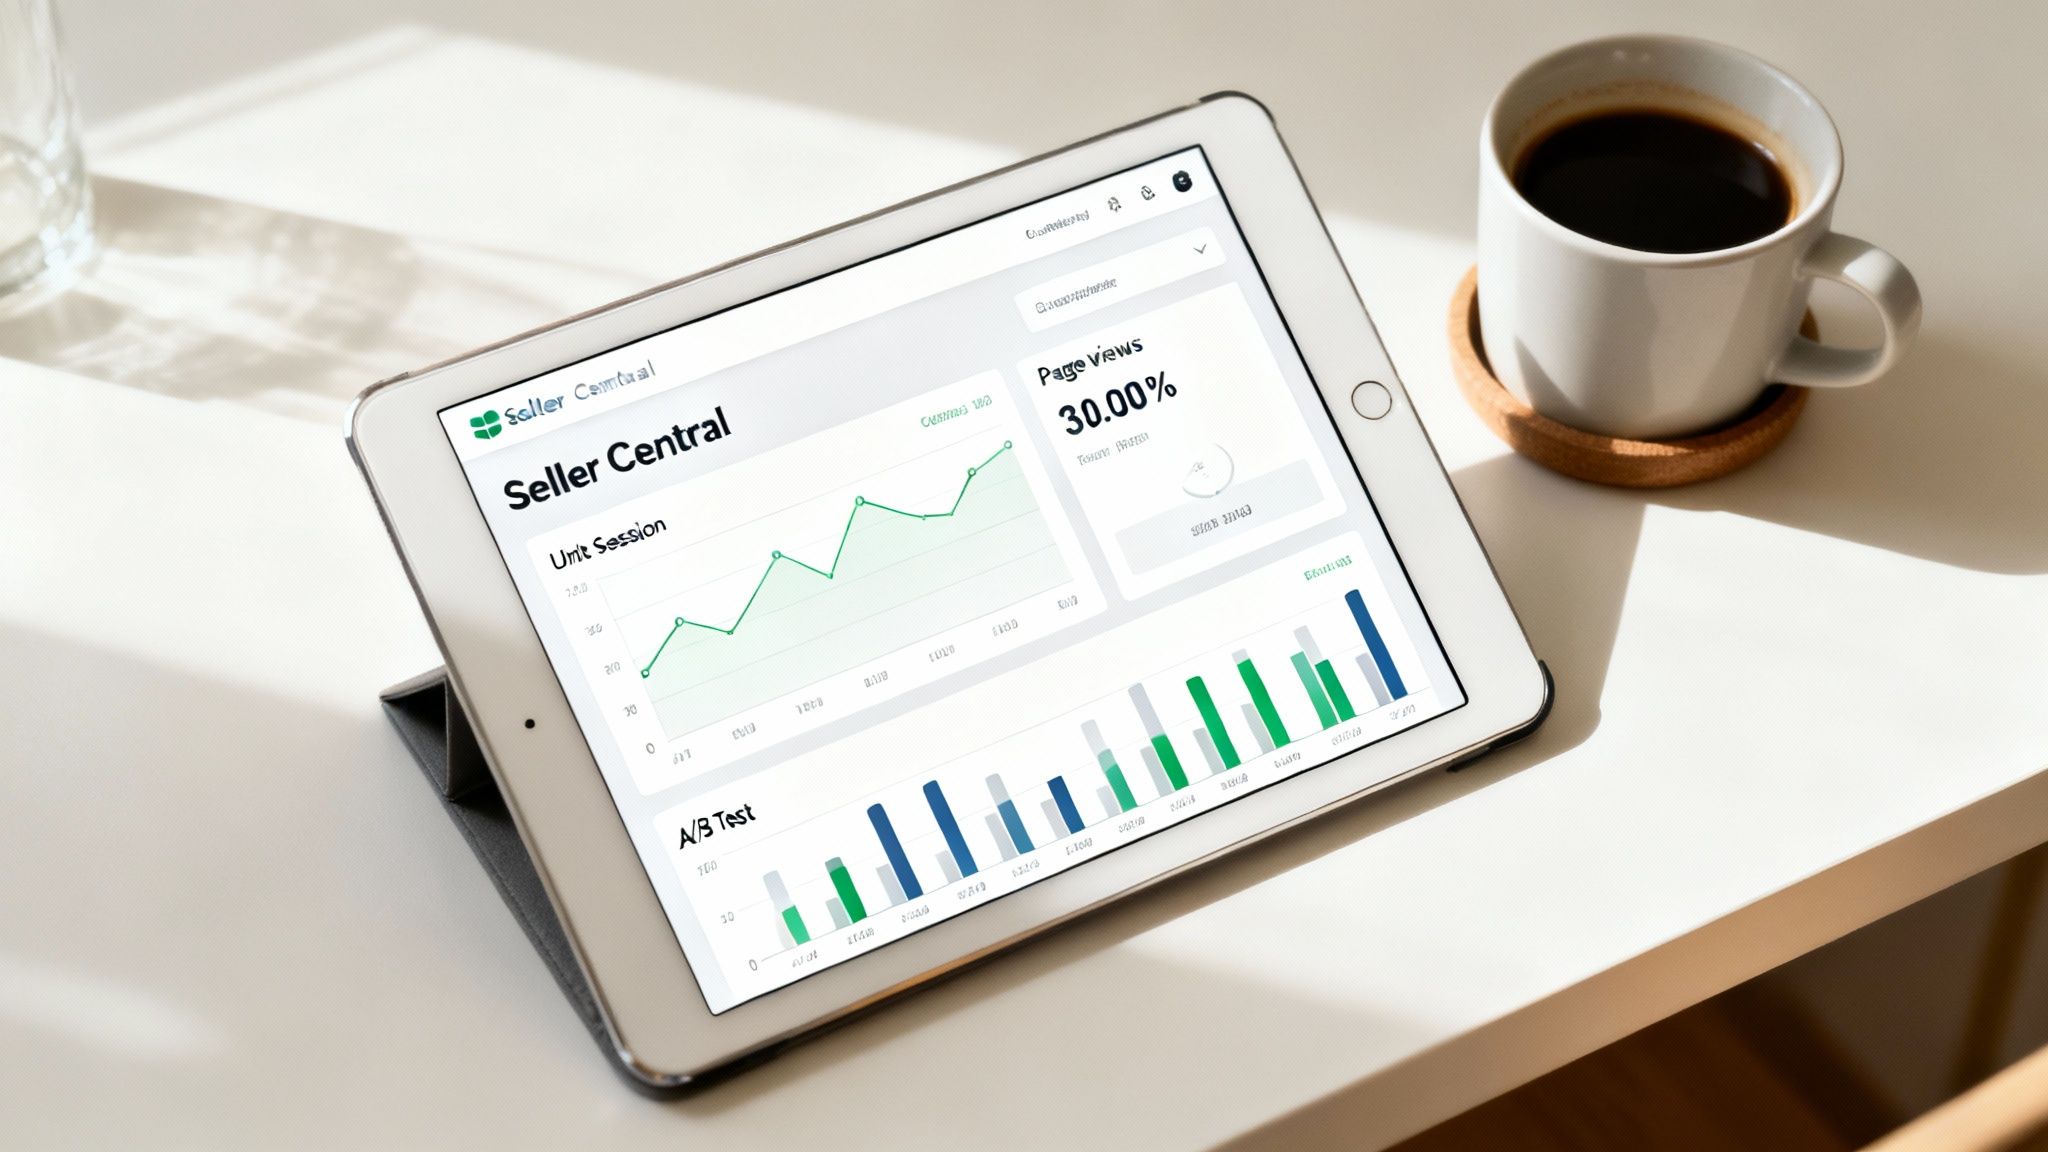
Jumping into Seller Central to see what the data tells you is how you turn good guesses into a data-driven strategy that actually wins. This is where you find out if your changes are moving the needle.
First stop: the Business Reports dashboard. It can look like a wall of numbers, but this is where you’ll find the vital signs of your listing’s health. Don't get overwhelmed; just focus on a few key metrics that tell you if your optimization efforts are paying off.
Key Metrics to Monitor
Three core metrics tell the real story of how shoppers are interacting with your page after you've made a change.
- Sessions: Think of this as the number of unique shoppers who visited your product page in a 24-hour period. If you’ve nailed your new title or main image, you should see this number climb as more people click through from the search results.
- Page Views: This is the total number of times your page was viewed. It can be higher than your sessions because one shopper might come back a few times before they buy.
- Unit Session Percentage: This is your conversion rate—the holy grail of listing optimization. Amazon calculates this by dividing the number of units ordered by the number of sessions. If this number goes up after you’ve tweaked your bullet points or A+ Content, you know your changes are working.
Tracking these metrics before and after an update is the only way to truly know if your changes are helping or hurting. For instance, a big spike in sessions but a drop in your conversion rate might mean your new title is attracting the wrong kind of traffic.
The Power of A/B Testing
Resist the urge to change everything at once. If you do, you’ll never know what actually worked. The best approach is to test one element at a time, a process known as A/B testing. It's the most reliable way to figure out what your customers really want.
Let's say you want to test a new main image. Run your current image for two weeks and record the performance data. Then, swap it for a new lifestyle shot and let that run for the next two weeks.
Compare the Unit Session Percentage for both periods. Whichever image produced a higher conversion rate is your clear winner. You can use this exact method for your title, price, or even just the first bullet point. This slow-and-steady approach gives you clear, actionable proof of what drives sales.
For a deeper dive into this process, check out our complete guide on how to leverage Amazon sales data to make smarter, more profitable decisions.
Got Questions? We've Got Answers
Even with the best optimization plan, you're bound to have a few questions. It’s a normal part of the process. Here are some quick, no-fluff answers to the questions we hear most often from sellers.
How Long Until I See Results?
This is the million-dollar question, isn't it? The honest answer is that it's a bit of a mixed bag. Once you hit 'save' on your updates, Amazon's A9 algorithm usually takes anywhere from a few hours to a couple of days to re-index everything. You might notice a small bump in traffic or your keyword rankings within that first week.
But the real, tangible impact—the kind you can measure in sales and conversion rates—typically shows up within 30 to 60 days. That timeframe gives you enough clean data to see what’s truly working, ironing out any random daily spikes or dips.
How Often Should I Be Updating My Listing?
Treating your listing optimization as a "one-and-done" task is a recipe for falling behind. A great rule of thumb is to give your core listings a thorough review every quarter. This keeps you ahead of new competitor tactics, seasonal buying habits, and the natural shifts in how customers search for your product.
Of course, sometimes you need to act faster. Be ready to jump in and update immediately if:
- You've improved the product: If you just rolled out a major feature change, your images and bullet points need to reflect that right away.
- Customers keep asking the same thing: A flood of similar questions is a clear sign that you need to address that point directly in your copy or an infographic.
- Performance takes a nosedive: If your conversion rate suddenly tanks, it's all hands on deck. Time to investigate what's wrong and start testing new elements.
Key Insight: Your Amazon listing should be a living document, not a static page. It needs to evolve with your performance data, customer feedback, and whatever your competitors are doing. Stagnant listings get buried.
Do I Really Need to Buy Expensive Tools to Do This?
Absolutely not. You don't need a whole arsenal of expensive software to get started. In fact, you can get some seriously impressive results using free resources that are right under your nose.
Amazon’s own search bar is a goldmine for keyword ideas—just start typing and see what autocomplete suggests. And spending an hour digging through competitor reviews? That’s invaluable for finding the exact language your customers use.
Sure, advanced tools can definitely speed up the process, especially with deep keyword research and tracking. But the core principles of clear writing, great photography, and putting the customer first don’t cost a dime to implement. Master the fundamentals first, and then you can think about investing in tools to scale your efforts.
Ready to stop guessing and start seeing real growth? The experts at Next Point Digital use data-driven strategies to turn your Amazon listings into high-converting sales engines. Learn how we can help you scale profitably.